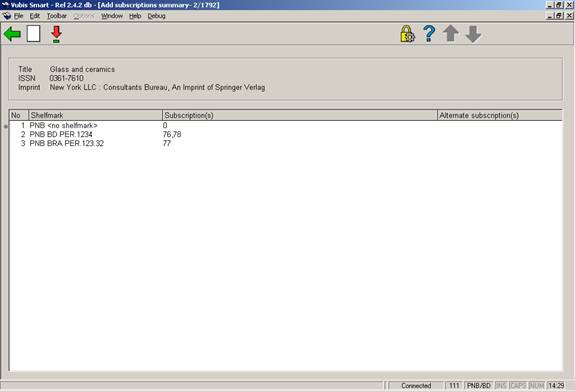
Selecting the option results in the system displaying the list of shelfmarks attached to the bibliographic record. Brief bibliographic data displays above the grid. This data is protected and includes the fields defined in the !Serial element/group profile record.
Shelfmark – Lists the shelfmarks defined for this bibliographic record. May or may be not be associated with a subscription.
Subscription(s) – Subscription(s) number for each shelfmark separated by a comma. If there is a 0 then the shelfmark has no subscriptions attached to it.
Alternate subscription(s) – Alternate subscription number(s) for each shelfmark separated by a comma.
[I] – Add a new shelfmark to this bibliographic record. Please refer to section 321.2.1.1.
[*] – select one of the displayed shelfmarks and click on this option to add a new subscription. Please refer to section 321.2.1.2.
After choosing the option the follwoing input form is displayed:

This form consists of the shelfmark fields to enter for this bibliographic record. The fields that display as part of the shelfmark are site definable. The possible fields are Location code, Sublocation code, Shelfmark prefix, Shelfmark classification, Shelfmark cutter/item, Shelving control number, Shelfmark suffix and Copy number.
Material type – material type to be assigned to this item.
Statistical category – statistical category to be assigned to this item.
Location code – Location of the item.
Sublocation code – optional field
Shelfmark classification – shelfmark.
Note
You must enter a value into either the Sublocation code or the Shelfmark classification fields.
Select one of the displayed shelfmarks from the List of subscriptions screen and click on the option to add a new subscription. If you are entering the very first subscription for a title, the system takes you to the Add subscription form after double-clicking the Subscription(s) field from the Full record screen

The Add subscription form consists of the fields defined in AFO 367 – Data to be added. They are in the order of the AFO367 – data to be added. The number of tabs varies based on the number of fields defined for the add screen. Please refer to section 321.3 for a detailed description of each of the fields.
Note
Because the library makes it’s own definitions in AFO 367 – Data to be added, the example may differ from what you see in your library.
This form also has the following buttons:
– This button is used to display a list of shelfmarks currently assigned to this bibliographic record.

Selecting one of the shelfmarks and clicking changes the shelfmark in the subscription currently being added.
– This button is used to add a new shelfmark to the current bibliographic record. The new shelfmark changes the shelfmark in the subscription currently being added. Please refer to section 321.2.1.1 for a detailed description.
When deleting a subscription the system first checks that you do not have the restriction, “Deletion of subscriptions” set. This is setup in AFO611 – Login restrictions – Serials. If you are not allowed to delete subscriptions, the system displays the message, .
If you are allowed the delete subscriptions, the system then checks to see if the subscription has a routing list. You are not allowed to delete a subscription that still has a routing list. The system displays the message, . The routing list must be deleted before deleting the subscription.
If no routing list is found on the subscription, the system asks the question, ? Press if you do not want to delete the subscription.
Select one of the displayed subscriptions from the List of subscriptions screen and click on the option to display and update a subscription’s details. The system displays the Subscription general data screen.
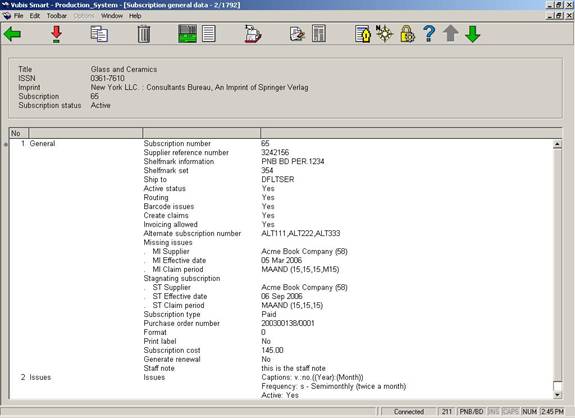
Brief bibliographic data displays above the grid. This data is protected and includes the fields defined in the !Serial element/group profile record. The subscription number and subscription status are also displayed.
The screen shows 4 groups. Group 1 is the Subscription General data about the subscription. Group’s 2 (Issues), 3 (Indexes) and 4 (Supplements) contain all the type of holdings/publications patterns currently connected to this subscription.
Note
Because the library makes it’s own definitions in AFO 367 – Data to be displayed, the example may differ from what you see in your library. Below, all the possible fields that can be displayed here are described.
General
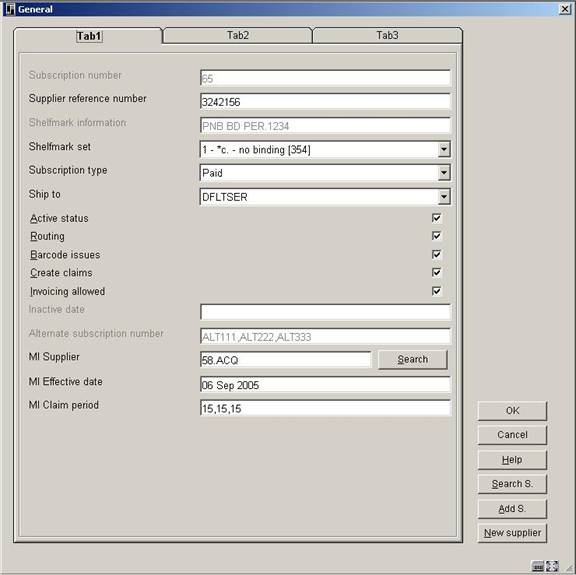
Subscription number – This field can be left blank (in which case the subscription number will be system generated based on a sequence number) or a number can be entered by the user. Subscription numbers must be unique. The subscription number is indexed. If you enter ‘G’ into the subscription field, the system uses an alternative numbering scheme to automatically generate the subscription number. Once a subscription number has been assigned to the subscription it can not be changed.
Supplier reference number - The supplier reference number can be entered at the Subscription level and or at the Type of holdings level. This is because the supplier may refer to the subscription DIFFERENTLY from the way that the library chose to catalogue it. Some suppliers, for example, may choose to treat Indexes as a completely separate entity from the regular Issues - (and indeed as separate bibliographic entities) - an example is the Copyright Agency (legal deposit) in the UK. The supplier reference number is indexed. This number is not necessarily a unique number.
Active status - Set the active status to “Yes” if you expect new issues of the serials to be arriving for this subscription. Set the active status to “No” if you do not expect new issues for this subscription (meaning you are no longer receiving it).
Shelfmark information – Current shelfmark location information
Shelfmark set – This is a dropdown list of shelfmark sets that can be attached to this subscription. One entry in the dropdown list is blank. If the blank entry is selected, the system creates a new shelfmark set.
Ship to – Ship to code for the subscription. This is a dropdown list of SHIPTO codes defined for your Meta institution for Serials. The SHIPTO code is mandatory and defines the location where the items for this subscription will be received. If you have five receiving locations for your serials, you would set up five SHIPTO codes. If all of your serials are received centrally, there would be only one SHIPTO code set up on your system. The SHIPTO code is instrumental in allowing receiving of multiple subscriptions in one step. The ship to code is defined in section 367.5 – Ship to codes.
Routing – If checked, the subscription is the routing copy. This field can be changed at any time. You can maintain the routing list for this subscription using the option from the Subscription general data screen.
Barcode issues – If checked, the user will be prompted to enter barcodes when receiving a serials issue in AFO 311.
Create claims – The Create claims checkbox controls if claiming is to be done on this subscription. If the Create claims field is checked then the MI supplier and the ST supplier should be filled in for claiming to occur. If the Create claims field is not checked then claiming does not occur.
Invoicing allowed – If this field is checked and there is a purchase order linked to this subscription, you are allowed to invoice this subscription. Please refer to section 321.3.3.3.
Alternate subscription number - Subscriptions may have one or multiple alternate subscription numbers. The alternate subscription numbers are separated by commas. Alternate subscription numbers are indexed.
Missing issues (MI Supplier, MI Effective date) - The MI Supplier is used for claiming if the system detects ‘missing issues’ for the subscription. This supplier must be in the acquisitions supplier file. The MI Effective date is the start date of the MI supplier for claiming. The MI supplier can change over time. The effective date tells the system which supplier to use for a date period. If you change the MI supplier,\, the effective date must also be changed and the effective date must be after the previous effective date. The system displays only the current MI Supplier and MI Effective date. The system groups the MI Supplier, MI Effective date and the MI Claim period fields together for display and input.
MI Claim period - This is the claim period cycle used for claiming missing issues. You can either enter a code defined in AFO 364 - Codes for reminder periods or enter up to three numbers (periods), separated by a comma. The first number specifies the number of days after the expected date that a first reminder claim must be sent. The second number specifies how many days after the first claim, the second reminder claims must be sent. The third number specifies how many days after the second reminder, the third reminder claims must be sent. The optional fourth number specifies the number of days after the last claim that the system will automatically set a claimed issue’s status to “Missing”. If codes are used the system displays the code and round brackets around the four numbers. For example: DFLT(31,31,31,M31). Codes can be defined in AFO 364 and refer to the periods for the three reminders (and the optional missing setting). It is preferable to define reminder periods using codes because this enables you to implement so-called global modifications. For example, if you want to change all subscriptions with an reminder period code of “DFLT” from 31,31,31 to 14,31,31, you can do this by modifying the period in AFO 364 once.
Stagnating subscription (ST Supplier, ST Effective date) - The ST Supplier is used for claiming if the system detects that the subscription has stagnated. This supplier must be in the acquisitions supplier file. The ST Effective date is the start date of the ST supplier for claiming. The ST supplier can change over time. The ST Effective date tells the system which supplier to use for a date period. If you change the ST supplier the effective date must also be changed. The effective date must be after the previous effective date. The system displays only the current ST supplier and effective date. The system groups the ST Supplier, ST Effective date and the ST Claim period fields together for display and input.
ST Claim period – This is the claim period cycle used for claiming a subscription that has stagnated. You can either enter a code defined in AFO 364 - Codes for reminder periods or enter three numbers (periods), separated by a comma. The first number specifies the number of days after the expected date that a first reminder claim must be sent. The second number specifies how many days after the first claim, the second reminder claims must be sent. The third number specifies how many days after the second reminder, the third reminder claims must be sent. If codes are used the system displays the code and round brackets around the three numbers. For example: DFLT(31,31,31). Codes can be defined in AFO 364 and refer to the periods for the three reminders. It is preferable to define reminder periods using codes because this enables you to implement so-called global modifications. For example, if you want to change all subscriptions with an reminder period code of “DFLT” from 31,31,31 to 14,31,31, you can do this by modifying the periods in AFO 364 once.
Explanation
Missing Issues / Stagnating Subscription claim reminder mechanism: A list of expected issues is created based on the subscription’s prediction algorithm. If predicted issues are not received by the expected receipt date, the claim reminder mechanism starts. The system makes a distinction between 'issues not received' and 'stagnated subscriptions'. In the first case, we are dealing with individual issues that have not yet come in; in the latter case with subscriptions for which no issues after a specific issue have been received. It is also possible to specify the periods at which reminders are sent. The lay-out of the claim reminders is defined in AFO 363. The claim reminder mechanism is a process that takes place in three steps (AFO 351/2/3) allowing you to manage reminders that the system automatically traces so that you, rather than the system, determine whether a claim reminder is sent.
Subscription type – The subscription type indicates how the subscription is obtained. There are three options.
- Free subscription
- Membership (subscription is obtained as part of a membership)
- Paid subscription
Review date – Use this field to determine when the subscription should be reviewed for renewal. It must be a valid date if used (optional).
Routing id – free text.
Materials format(s) - Indicate format(s) of material arriving on this subscription (i.e. BNB on CD-ROM, loose-leaf legal updating services). This is a dropdown list of entries that are maintained by the library in AFO 367.4 – Serials authority lists. You may make multiple selections from the dropdown list.
Purchase order number – A link from the subscription to the acquisitions purchase order can be made using the Purchase order number field. This is a dropdown list displaying the purchase order numbers (including the partial order numbers for each purchase order) on this bibliographic record. This field must be set before you can invoice subscriptions. See section 321.3.3.3.
Issue cost - The library enters the cost of a single issue here. It is information only. It does not have any affect on the cost used for notices to borrowers.
Format - Indicate if the subscription includes electronic version as well as or instead of printed version. This is a dropdown list consisting of three values:
- Paper
- Electronic
- Both
Generate renewal – Checkbox display only field.
Inactive date – the system sets this field when the subscription active status is set to “No”.
Origin - Origin of the serials (French, not French, local, etc.). This is a dropdown list of entries that are maintained by the library in section 367.4 – Serials authority lists.
Print label - This flag can be changed at any time. It has no effect on the printing of a serial label in this release.
Public note – Enter a public note.
Staff note – Enter a staff note.
Renewal period – Renewal period is a free text field that is display only.
Statistical category – This is display only. This is a dropdown list of entries that are maintained by the library in section 367.4 – Serials authority lists.
Subscription cost - The cost of the subscription is entered here. This is an information only field that may be used to create reports. The subscription cost represents the cost that the library pays to retain the subscription from the start date to the end date of the subscription.
Subscription start – The subscription start date is the starting date of the subscription. The date can be past or future. The start and end dates are checked to ensure that the start date is before the end date.
Subscription end – The subscription end date is the last date which the library expects to receive issues. The date can be past or future. The start and end dates are checked to ensure that the start date is before the end date.
Optional fields 01 to 10 - There are 10 optional fields in the subscription record that the library can optionally choose to define and use.
Group 2 Issues, 3 Index, 4 Supplements - Each of these three groups displays the following fields. These groups represent the three major groupings for type of holding. Multipart and serials holdings must have at least one Type of Holding record. The purpose of this record is to identify the type of publication associated with the multipart/serial bibliographic item. The most common types of holdings are issues, indexes, and supplements. You can have as many Types of Holdings records as needed to describe your multiparts/serial. The Type of Holding record provides access to the publication pattern record and issue numbering records. For example, you might have a subscription that entitles you to the paper issues that are published monthly and the microfiche that is published annually. This subscription requires two different Issue type of holdings: Paper issues and Microfiche. Each of these type of holdings has its own publication and prediction pattern.
![]()
You can define the type of holding once and then link this type of holding to multiple subscription records.
Captions – The captions are the enumeration captions followed by the chronology captions in round brackets. The captions are defined in the publication pattern.
Frequency – The frequency code and description of the frequency assigned in the publication pattern.
Active – The active status of the publication pattern is either set to Yes for active or No for inactive.
Note – This is the frequency note from the publication pattern.
Next expected – This is the next expected issue for this subscription.
Note
When entering date fields, you can either enter a valid date or enter one of the T, T-n or T+n formats. If using one of the T formats, the system fills in the field with a date relative to Today’s date. For example, if the current date is March 16, 2006, the system fills in the following:
T – March 16, 2006
T-30 – February 14, 2006
T+365 – March 16, 2007
[*] – use this option to select one of the 4 groups. 1 General, 2 Issues, 3 Index or 4 Supplement.
[K] – Copy the current subscription to create a new subscription. The fields that get copied are determined based on the setting of the copy flag in AFO 367 – Subscription data definition. This option is permission controlled.
[S] – Delete the current subscription. Please refer to section 321.2.1.3 for a detailed description.
[HS*] - select one of the displayed type of holding/publication patterns and click on this option to change the retrospective holdings statement, follow up statement or autogenerate flag for this type of holding/publication pattern on this subscription. When creating a summary holdings statement, the system will first display the Retrospective statement, then, if the Automatically generate statement flag is set, display the system generated holdings and then display the Follow up statement. Please refer to section 321.4.3.
(O) – If the subscription has a purchase order linked to it selecting this option will display the purchase order detail. Please refer to the help for AFO 211 for a detailed description.
[R] – Selecting this option will take you to Serials receiving. Please refer to section 311.2 for a detailed description.
[RI] – Displays the list of received, claimed, and expected issues for this subscription. From this option you may delete receipt information and/or invoice the subscription. Please refer to section 321.3.3 for a detailed description.
[AS] – This option allows you to enter/modify the alternate subscription numbers on this subscription. You are also allowed to change the original subscription number using this option. Please refer to section 321.3.4 for a detailed description.
[CT] – Displays the list of issues that have been routed. Please refer to the help for AFO 341 for a detailed description.
[RL] – Shows the list of borrowers on the routing list for this subscription. Use this option to maintain the routing list for this subscription. Please refer to the help for AFO 342 for a detailed description.
From the Subscription general data screen, select group 1 and press enter. The system displays the General form.
Please refer to section 321.3 for a detailed description of the fields. Press to save your changes.
This form has the following extra buttons:
– This button is used to display a list of shelfmarks currently assigned to this bibliographic record.
Selecting one of the shelfmarks from the screen and clicking changes the shelfmark in the current subscription.
– This button is used to add a new shelfmark to the current bibliographic record. The new shelfmark changes the shelfmark in the subscription. Please refer to section 321.2.1.1 for a detailed description.
– This button allows you to add a new supplier to the supplier file just as it is done in AFO 241 – Supplier. Please refer to the help for AFO241 for a detailed description.
Selecting one of groups 2 (Issues), 3 (Indexes) or 4(Supplements) from the Subscription general data screen results in the system displaying a screen containing all of the type of holding/publication patterns currently connected to this subscription for the selected group. The system displays the Type of holding summary screen. Please refer to section 321.4.
From the Subscription general data screen, select the option. The system displays the Subscription number form. Use this option to copy the contents of the current subscription to make a new subscription.
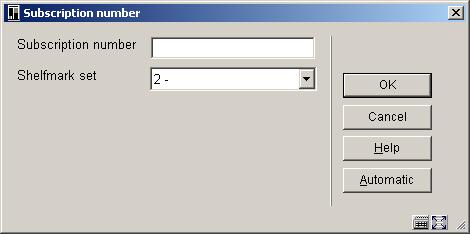
Subscription number – Enter a new subscription number. The subscription number must be unique. To generate a new system assigned subscription number, click the button.
Shelfmark set – This is a dropdown list of shelfmark sets that are not yet attached to a subscription. One entry in the dropdown list is blank. If you choose the blank entry, a new shelfmark set will be created for this subscription.
After pressing , the system creates a new subscription and returns you to the Subscription general data screen.
From the Subscription general data screen, select the option. The system displays the Receipt information screen.
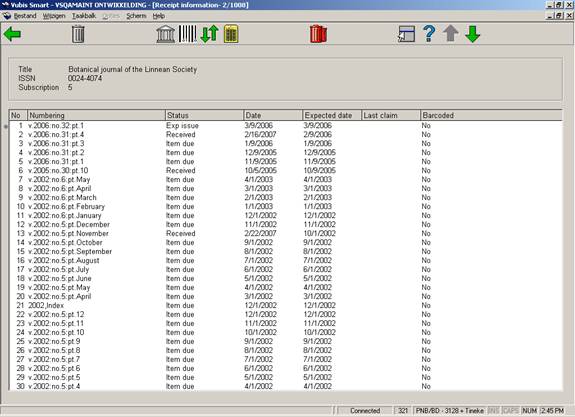
Brief bibliographic data displays above the grid. This data is protected and includes the fields defined in the !Serial element/group profile record. Subscription number is also displayed.
Numbering – The enumeration is first followed by chronology in round brackets for each issue.
Status – Status can be Received, Returned, Claimed, Exp issue, Exp index, Exp suppl, Missing, In bindery, Bound, No action, Item due, Withdrawn, Microfilm, 6 optional, Not expected. Please refer to section 367.7 – Issue status codes for details.
Date – Date associated with the current status.
Expected date – Date the issue is expected.
Last claim – The last claim field has several pieces of information.
Example 1: 1m:09 Sep 2005. The first number is the number of times the issue has been claimed. This example means that has been claimed once. Next is a letter ‘m’ or ‘s’. The ‘m’ is for a missing issue claim and the ‘s’ is for a stagnating subscription claim. This example means that the issue has been claimed 1 time for a missing issue. The “:” is a separator and is followed by the claim date.
Example 2: Tel:15 Jul 2004. The first part is ‘Tel’ which means the claim was done by telephone. The “:” is a separator and is followed by the claim date.
Barcoded – Field contains a “Yes or No” to determine whether the issue should be barcoded during the serials receiving process.
[D*] – This option allows you to delete an issue from the receipt list for this subscription and shelfmark set. If the issue is barcoded, the system will ask whether you also want to delete the barcode.
: when you select this option, the system displays the “Send issues to bindery” screen showing all received issues that do not yet have the ‘Bound’ status and are not already barcoded. Please refer to section 321.3.3.1.
: when you select this option, the system displays the “Mark issues as bound/barcoded’ screen showing all unbarcoded issues that have either the ‘In bindery’ or ‘Bound’ status. Please refer to section 321.3.3.2.
: The Receipt information screen displays issue, index and then supplement information in reverse chronological order (i.e. most recent first). This option can be used to facilitate the discard process for older issues. When this option is selected, the Receipt information screen displays issue, index and then supplement information in chronological order (i.e. oldest first).
[FA*] – This option allows you to invoice the subscription. Please refer to section 321.3.3.3.
: This option allows you to delete all issues from the receipt list for this subscription and shelfmark set. The system will prompt for confirmation.
: when you select this option, the system displays the “Send issues to bindery” screen showing all received issues that do not yet have the ‘Bound’ status and are not already barcoded. From this screen, you select the issues that you wish to bind together and then update their statuses to ‘In bindery’. An overview screen will be displayed:
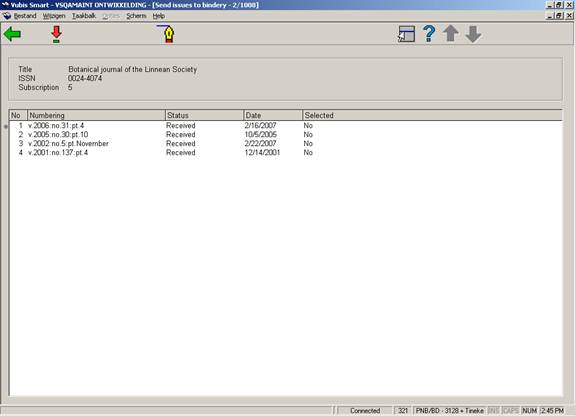
: Select the displayed issues you wish to bind together. You will see that the Selected column will toggle from No to Yes.
: When you have finished your selections, use this option to change the status of the selected issues to ‘In bindery’. When you are finished with your selections, the system returns to the Receipt information screen.
: when you select this option, the system displays the “Mark issues as bound/barcoded’ screen showing all unbarcoded issues that have either the ‘In bindery’ or ‘Bound’ status. From this screen, you select the issues that you wish to bind together and then update their statuses to ‘Bound’. You will be asked whether you wish to assign a barcode to the issues. An overview screen will be displayed:

: Select the displayed issues you wish to barcode. You will see that the Selected column will toggle from No to Yes.
: When you are done your selections, use this option. The system asks, “Do you want to barcode the bound issues?”.

If you press , the system will display the “Add a new item” form. After entering a barcode and pressing on this form, the system changes the status of the selected issues to ‘Bound’.
If you answer to the “Do you want to barcode the bound issues?” prompt, the system changes the status of the selected issues to ‘Bound’. If you answer , the system does nothing.
The system then redisplays the Mark issues as bound/barcoded screen.
From the Receipt information screen, select one of the displayed lines and then choose the option. The system displays the following form:
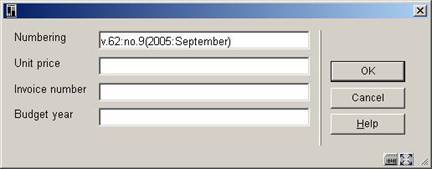
Numbering – Defaults from the select line on the Receipt information screen. You can change this field to indicate a range of issues if required.
Unit price – Enter the price of the issue or issues that you are invoicing.
Invoice number – Enter the invoice number to be assigned.
Budget year – Enter the budget year to charge the invoice against (optional).
After you press , the system prompts for the individual discount, individual tax and settings for prorate flags to apply to the invoice detail line. After pressing , the system creates an invoice detail on the specified invoice and creates an invoiced receipt in the purchase order that is linked to this subscription.
From the Subscription general data screen, select the option. The system displays the Alternative subscription numbers screen.

Alternative subscription numbers - multiple alternate subscription numbers may be entered separated by commas. These alternate subscription numbers are indexed (in the Alternate subscription number index) and only have to be unique within the subscription.
Subscription number – use this field when you want to change the original subscription number to a new number. The new number displays on any screen where the subscription number is displayed. Searching (using the Subscription number index) is possible using either number. The original and subsequent subscription numbers must be unique across the serials institution.
Selecting one of groups 2 (Issues), 3 (Indexes) or 4(Supplements) from the Subscription general data screen results in the system displaying a screen containing all of the type of holding/publication patterns currently connected to this subscription for the selected group (i.e. Issues, Indexes or Supplements field selected on the Subscription general data screen). For example, you might have a subscription that entitles you to the paper issues that are published monthly and the microfiche that is published annually. This subscription requires two different Issue type of holdings: Paper issues and Microfiche. Each of these type of holdings has its own publication and prediction pattern.

Brief bibliographic data displays above the grid. This data is protected and includes the fields defined in the !Serial element/group profile record. Subscription number is also displayed. Below is a grid containing the following information for each type of holding/publication pattern combination attached to this subscription.
Description – description (code) that identifies a specific type of holding on a title.
OPAC label – label that displays in the WebOpac as a prefix to the holding statement for this type of holding.
Captions/Labels – the captions/labels from the active publication pattern attached to this type of holding
– use this option to add a new type of holding/publication pattern to the subscription. Please refer to section 321.4.1.
[*] – select one of the displayed type of holding/publication patterns and click on this option to display the publication pattern, change the publication pattern or update the next expected information. Please refer to section 321.5.
[T*] – select one of the displayed type of holding/publication patterns and click on this option to go to the Update type of holdings form to change Description, OPAC label, Default for serials checkin or Compress holdings flag. Please refer to section 321.4.2.
[D*] – select one of the displayed type of holding/publication patterns and click on this option to delete the type of holding from the subscription. You are not allowed to delete a type of holding/publication pattern if there are receipts attached to the subscription.
[HS*] - select one of the displayed type of holding/publication patterns and click on this option to change the retrospective holdings statement, follow up statement or autogenerate flag for this type of holding/publication pattern on this subscription. When creating a summary holdings statement, the system will first display the Retrospective statement, then, if the Automatically generate statement flag is set, display the system generated holdings and then display the Follow up statement. Please refer to section 321.4.3.
[PP*] – select one of the displayed type of holding/publication patterns and click on this option to see the history of publication pattern changes. Please refer to section 321.4.4.
From the Type of holding summary screen, select the option. The system displays the Add type of holdings form.

Type – is a protected field and is carried over from the choice made on the Subscription general data screen.
The other fields on this form are divided into three sections by a _________ line.
Section 1 – allows you to link to a type of holding/publication pattern that already exists on this title.
Choose from an existing Type of holding – this is a dropdown list that contains all of the type of holdings already attached to other subscriptions on this title. Check to see if another staff member has already entered the publication pattern information you want. If so, select that entry and proceed to section 3 of this form.
Section 2 – allows you to add a new type of holding/publication pattern to the current subscription. When you are finished, the new type of holding/publication pattern can be used by other staff members when they create other subscriptions for this title.
Create a new record – Select a valid type of holding from the dropdown list. This authority list (4223) is maintained via AFO 367. The description cannot have been used to describe any other type of holding records on this title.
OPAC label – Select a valid label for display in the WebOpac from the dropdown list, for the type of holding selected above. This authority list (4224) is maintained via AFO 367.
Default for serials checkin – if checked, this type of holding will be the one that is used as a default for receiving in serials.
Choose a pattern template – this is a dropdown list of publication pattern templates that are shared across titles. Pattern templates include labelling, numbering and publication regularity information. The entries in this dropdown list are the result of saving certain patterns with the option Save as template. Please refer to section 321.5.3 for an explanation of this option.
Section 3 – allows you to enter information that controls the holdings statement that is produced for this type of holding/publication pattern on this subscription. When creating a summary holdings statement, the system will first display the Retrospective statement, then, if the Automatically generate statement flag is set, display the system generated holdings and then display the Follow up statement.
Retrospective statement – enter a retrospective note summarising what you already hold for this subscription. Enter a carriage return to force a new line within the retrospective statement. This field is optional.
Automatically generate – if checked, the system will automatically build a holdings statement when issues are received, moved to a new location, etc.
Follow up statement - enter a follow up note. Enter a carriage return to force a new line within the follow up statement. This field is optional.
After pressing the button, the system displays the Publication pattern screen. If you had not selected a Pattern template out of the list, the system displays the Edit publication pattern form.
From the Type of holding summary screen, select the option. The system displays the Update type of holdings form.

Type - is a protected field and is carried over from the choice made on the Subscription general data screen.
Description – enter a unique description for the type of holding. The description cannot already be used to describe another type of holding record on this title.
OPAC label – enter the label that displays in the WebOpac for this type of holding.
Default for serials checkin – if checked, this type of holding will be the one that is used as a default for receiving in serials.
Compress holdings - Indicates whether the holdings data can be compressed or expanded by computer algorithm. If checked, holdings statements will include ranges of held issues (i.e. v.1-v.5). If left unchecked (or in the case of Indexes), holdings statements will include a list of each held issue (i.e. v.1,v.2,v.3,v.4,v.5). When you toggle the setting of this field, the system regenerates all automatically generated holdings statements on this title that use the current type of holding.
From the Type of holding summary screen, select the option. The system displays the Holdings statement form.
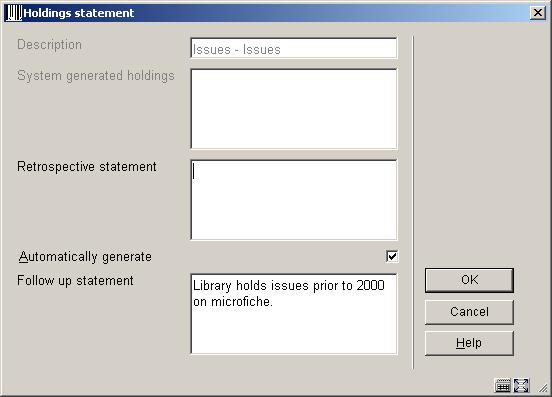
Description – this field is protected and contains the type of holding description.
System generated holdings – this field is protected and, if the Automatically generate flag is set, displays the holdings statement generated by the system.
Retrospective statement – enter a retrospective note summarising what you already hold for this subscription. Enter a carriage return to force a new line within the retrospective statement. This field is optional.
Automatically generate – if checked, the system will automatically build a holdings statement when issues are received, moved to a new location, etc.
Follow up statement - enter a follow up note. Enter a carriage return to force a new line within the follow up statement. This field is optional.
When the system displays a summary holdings statement it formats it to include the contents of the Retrospective statement field, the System generated holdings field and the Follow up statement field. Each field begins on a new line.
From the Type of holding summary screen, select the option. The system displays the Publication pattern history form. This form contains a grid that displays the changes in the Publication pattern that have resulted from the use of the command.

Each line of the grid describes a publication pattern including its type of holding description, enumeration level captions, chronology level captions, status, frequency and frequency notes.
The first line is always the current, active publication pattern. Subsequent lines describe publication pattern changes starting with most recent and working backwards. A separate holdings statement is created for each change in publication pattern.
From the Type of holding summary screen, select the option. The system displays the Publication pattern screen.
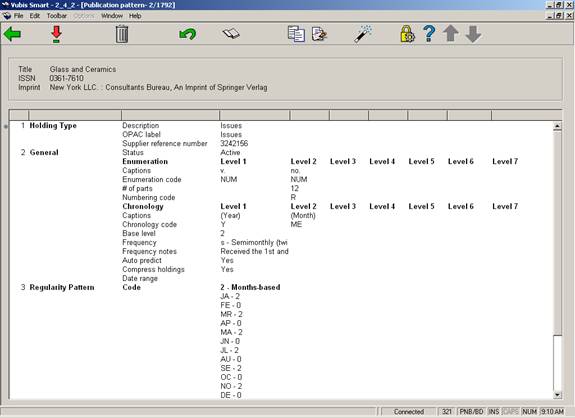
The Publication pattern screen consists of four groups:
1. Holding Type – selecting this option allows you the enter/update the supplier reference number, captions, numbering, valid predictions, etc associated with this publication pattern.
2. General – selecting this option allows you the enter/update the supplier reference number, captions, numbering, valid predictions, etc associated with this publication pattern.
3. Regularity pattern – selecting this option allows you to enter/change the regularity pattern for this publication. Regularity pattern includes when the title is published and what pattern the publication follows.
4. Next expected – selecting this option allows you to enter/update the next expected information and view predictions.
[<esc>] – saves the publication pattern and returns to the previous screen.
[*] - select one of the four displayed groups and click on this option to display/update the information in this group. Please refer to section 321.5.1.
[S] – delete this publication pattern.
[C] – undo changes that you have made to this publication pattern since the last time you saved it.
[G] – displays the record editor form in read-only mode for the current title.
[K] – use this option to copy the current publication pattern before making changes. The result is that any historic receipts will retain the numbering and caption information from the original publication pattern. Any next expected or future receipts will use the numbering and caption information from the new publication pattern. You should only use this option if you need to retain the old publication pattern information. Please refer to section 321.5.2.
[P] – use this option to share publication patterns with other users. The system prompts with the Save as template form. Please refer to section 321.5.3.
[V] - selecting this option allows you to enter/update the next expected information and view predictions. It is the same as selecting Group 4 – Next expected for editing. Please refer to section 321.5.1.3.
For examples of publication patterns, please refer to section 321.5.4.
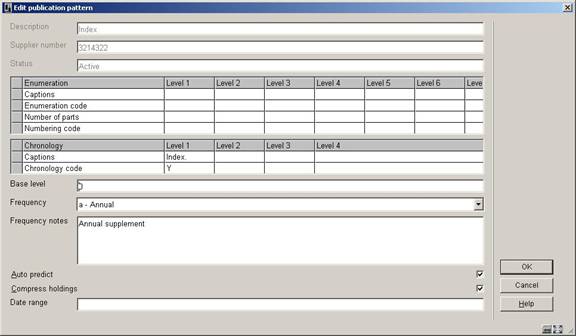
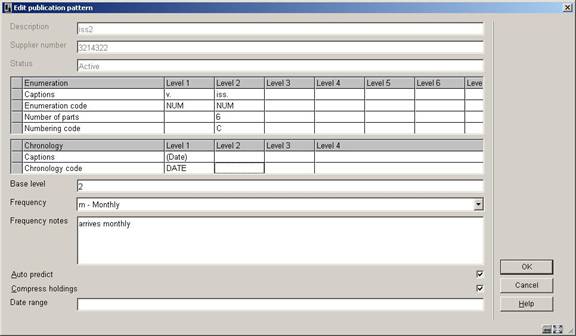
Selecting Group 1 (Holding type) or Group 2 (General) from the Publication pattern screen results in the system displaying the Edit publication pattern form.

Description – description field from the type of holding record.
Supplier number – the supplier’s reference number can be entered on this form only if it was not assigned at the subscription level. In the case that it is added at this level, an index search using the supplier reference number will be able to determine the type of holding that is being received.
Status – Active – the publication pattern is active. Inactive – the publication pattern has been superseded and is no longer in use.
Enumeration – defines the numbering of the predicted issues. The system allows you to define seven levels of enumeration. For each level, there are four fields that work together to define how the numbering is predicted.
1. Captions –specify a caption for each level you want to use. Make sure you include punctuation. Most patterns have at least one level. Enclose this text in round brackets or square brackets to suppress the display of the text when enumeration is displayed. Enclose this text in curly brackets if you do not wish to see the information for a particular level display at all when predictions are displayed. In this situation, the enumeration level is created to allow accurate predictions but you do not want to include this level when the predicted issues display. For example, if you have a publication with numbering that includes two numbers (i.e. v. and no.) and you want to predict 2 subsequent issues with the same enumeration and differing chronology, create a third level of enumeration (i.e. pt.) and enclose the caption with curly brackets, set the number of parts to 2 and set the numbering code to reset. The system will predict something similar to the following: v.23:no.2(2003:February), v.23:no.2(2003:March), v.23:no.3(2003:April).
2. Enumeration code (*) – defines whether the predicted numbering at the selected level is a number, alphabetic, roman numeral or a constant. Select F8 (or type in ?L) to see and choose from the list of valid codes. Enumeration codes are defined in section 367.2.8.
3.
Number of parts – defines how many units at the selected level make up the higher level. Used by the system when predicting issues, for determining when to increment the next higher level’s counter. Specify a number for each level of enumeration except the first .In the example, twelve no. (issue) units make up one v. (volume).
4. Numbering code (*) – defines whether numbering at the selected level increments indefinitely or restarts when the next highest unit increments. For example, after v.25:iss.12 is received, should the system predict v.26:iss.13 (continuous) or v.26:iss.1 (restart/reset). Select F8 (or type in ?L) to see and choose from the list of valid codes. Numbering codes are defined in section 367.2.7.
Chronology – date information that identifies the published issue. The system allows you to define up to four levels of chronology. For each level, there are two fields that work together to define how the date information is predicted.
1. Captions – Enter the caption or label. Enclose this text in round brackets or square brackets to suppress the display of the text when chronology is displayed. For example, (year.) (mo.) (d.) is replaced by 2005:NOV:15. Used by the system as entry prompts and display in holdings statements, parts lists, and serials holdings display.
2. Chronology code (*) – Specify a Chronology Code. Specifies the kind of chronological data at this chronology level; e.g. year (YYYY format), month (MMM format), date (MM/DD/YY format). Select F8 (or type in ?L) to see and choose from the list of valid codes. Used by the system to generate data in holdings statements and to edit-check data entered by the user. Chronology codes are defined in section 367.2.5.
Base level - The base enumeration level usually the lowest level but in some month-based patterns the next-to-lowest level. Used by the system when predicting issues, for determining whether a change in month should reset the numbering. The numbering of the lowest and next-to-lowest levels are also affected by the lowest level’s Numbering code and Number of parts.
· Setting the Base level to the lowest level - If you set the Base level to the lowest level (such as 2 in the sample screen), then a change in month will not automatically reset the lowest level’s numbering. If the lowest level’s Numbering code is continuous, then the level’s numbering continues to increase indefinitely. If the code is restart/reset, then the level’s numbering is reset every M issues (where M = number of parts). In either case, the next higher level’s numbering is incremented every M issues.
· Setting the base level to the next-to-lowest level - If you set the Base level to the next-to-lowest level (such as 2 in the 3-level serial), then the system can handle patterns with different numbers of issues published each month. If the lowest level’s Numbering code is continuous, then that level’s numbering increases indefinitely. If the code is restart/reset, then that level’s numbering is reset each time a new month begins (or every M issues, whichever comes first). In either case, the next higher level’s numbering is incremented each time a new month begins (or every M issues, whichever comes first).
Frequency – Describes the frequency of publication and is selected from either the frequency code list from the MARC21 or UNIMARC standard. These codes are for information purposes only with the exception of five codes which are interpreted by the system: biennial – repeat regularity pattern every 2 years, triennial – repeat regularity pattern every 3 years, quadrennial – every 4 years, quinquennial – every 5 years and decennial – every 10 years. The system uses this information when predicting the years of expected issues. Frequency codes are defined in section 367.9.
Frequency notes – A note about the publication pattern. For example, Monthly with an extra issue in May and October; 14 issues per volume and continuously incrementing issue numbers.
Autopredict – If checked, the system predicts the enumeration, chronology, and expected receipt dates. Predictions display on the View predictions form. Leave unchecked if the pattern is too erratic to predict. The Numbering that you define on the Serial predictions form will be repeated for all expected issues.
Compress holdings – Indicates whether the holdings data can be compressed or expanded by computer algorithm. If checked, holdings statements will include ranges of held issues (i.e. v.1-v.5). If left unchecked (or in the case of Indexes), holdings statements will include a list of each held issue (i.e. v.1,v.2,v.3,v.4,v.5)..
Date range - range of enumeration and chronology to which the pattern applies. For example, Vol.23 No.2- (1991:February- )for a pattern whose prediction start issue was the February 1991 issue. Before you use the Copy option to inactivate the current publication pattern and create a new active publication pattern, you may add the closing issue’s enumeration and chronology here. This information is stored but not otherwise used by the system.
Some notes on navigating the grid
Arrow keys are used to navigate within the columns and rows in a grid. As you navigate through the cells of the grid using the arrow keys, the current cell is surrounded by a grey rectangle. When you start typing in a cell or if you press the F2 key, the cell goes into edit mode (a cursor appears in the textbox). When you are finished making changes in a cell, you must either press the <Enter> key or the <Tab> key. Either of these keys will take you out of edit mode. You can then use the arrow keys to navigate to the next cell in the grid or use the <Alt><Tab> or <Tab> keys to go to the previous or next control on the form respectively. In the example below, the Supplier number, Status, Enumeration, Chronology, Base level and Frequency are controls.

When entering a new publication pattern or after selecting the button on the Regularity pattern group form, the Publication pattern regularity form displays.
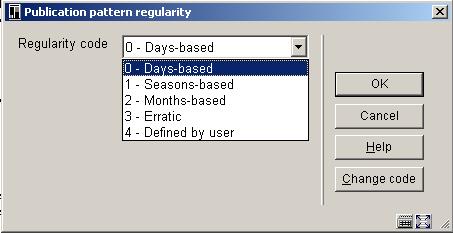
Regularity code - describes the publication regularity: month-based, season-based, day-based (week-based), erratic, or user-defined.
After you press , the system displays additional fields for detailed information so that it can predict the serial’s publication dates accurately. The system displays different detail fields for the different Regularity codes except that month-based and season-based types are treated identically.
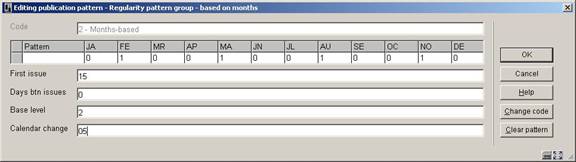
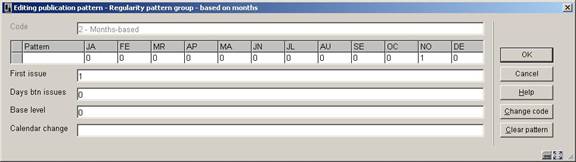
1. Regularity pattern group based on months or seasons:

Pattern – number of issues published each month of the year. Answer 0 for months in which no issues are published. The system defaults to 1 for each month. Use the button to reset all of the months to 0.
First issue – Day on which the first issue of each month is published. For example, 1 indicates the 1st day of each month in which issues are published.
Days btn issues – Number of days between issues in the months during which more than 1 issue is published. For example, 14 indicates 14 days — if the first issue date is the 1st and there are 2 issues published in the month, then the predicted second issue date will be the 15th. This field has no effect if none of the months have more than 1 issue published. If more issues are predicted in the month than can fit, then the final issues will be predicted on the last day of the month. For example, if the First issue date is the 5th but there are 3 issues published in November, then the predicted issue dates will be the 5th, 19th, and 30th.
Base level - The base enumeration level — usually the lowest level but in some month-based patterns the next-to-lowest level. Used by the system when predicting issues, for determining whether a change in month should reset the numbering. The numbering of the lowest and next-to-lowest levels are also affected by the lowest level’s Numbering code and Number of parts.
· Setting the Base level to the lowest level - If you set the Base level to the lowest level (such as 2 in the sample screen), then a change in month will not automatically reset the lowest level’s numbering. If the lowest level’s Numbering code is continuous, then the level’s numbering continues to increase indefinitely. If the code is restart/reset, then the level’s numbering is reset every M issues (where M = number of parts). In either case, the next higher level’s numbering is incremented every M issues.
· Setting the base level to the next-to-lowest level - If you set the Base level to the next-to-lowest level (such as 2 in the 3-level serial), then the system can handle patterns with different numbers of issues published each month. If the lowest level’s Numbering code is continuous, then that level’s numbering increases indefinitely. If the code is restart/reset, then that level’s numbering is reset each time a new month begins (or every M issues, whichever comes first). In either case, the next higher level’s numbering is incremented each time a new month begins (or every M issues, whichever comes first).
Calendar change - Only affects predictions if the lowest level of enumeration is defined as using a continuous Numbering code. Can be defined to force the next higher level of enumeration to increment at specific month(s) (MM format) or specific date(s) (MMDD format); for example, 04,10 forces the next highest level of enumeration to increment in April and October while the numbering in the continuous enumeration level continues to increase.
2. Regularity pattern group based on daily/weekly:

Pattern – Number of issues published each day of the week. Answer 0 for days on which no issues are published. The system defaults to 1 for each day. Use the button to reset all of the days to 0.
Repeat cycle (in weeks) - Number of weeks between the weeks in which issues are published. Examples: 1 means issue(s) are published every week; 2 means every second week; and so on.
Base level – see previous description.
Calendar change – see previous description.
3. Regularity pattern group based on erratic publication:

Days between issues – number of days between issues
Calendar change – see previous description.
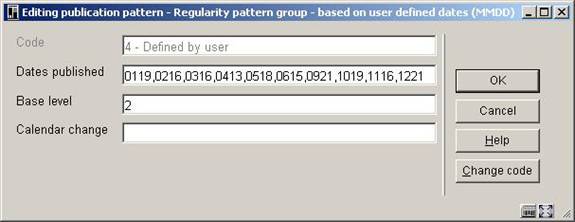
4. Regularity pattern group based on user-defined publication dates:

Dates published – Publication dates of the issue. Enter the four digits (MMDD) for each publication date separated by comma. For the example above, the system will make predictions based on publication dates of January 1, January 15, May 6 and July 8.
Base level – see previous description.
Calendar change – see previous descriptions.
Use the button to display the Publication pattern regularity form on which you can change the Regularity code for this publication pattern. Please refer to section 321.5.1.2.
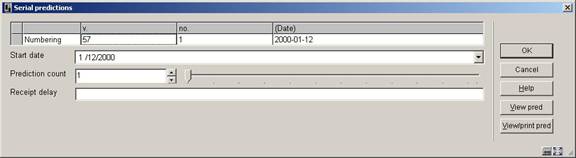
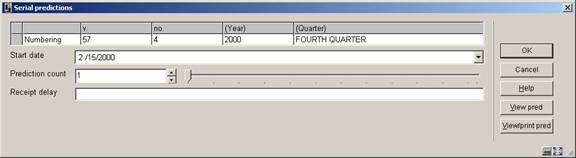
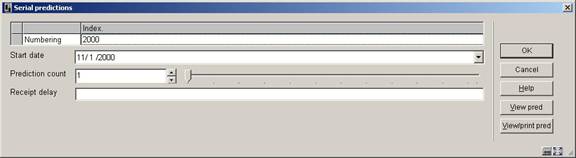
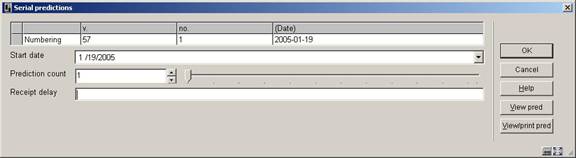
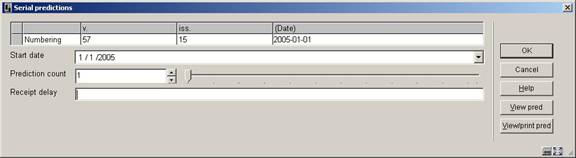
Selecting Group 4 (Next expected) or the option from the Publication pattern screen results in the system displaying the Serials predictions form. This form allows you to enter/update next expected issue information and view predictions.
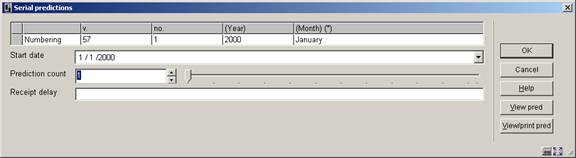
Numbering – Enter the starting enumeration/chronology for each level. For chronology fields that have chronology codes with valid predictions (i.e. months, days of week, seasons), you can press F8 (or type in ?L) to see a list of valid entries. In this case, the system will verify that you enter a valid prediction in the field. Fields in which you can use F8 (or type in ?L) to see a list of valid entries are denoted by (*).
Start date – The starting issue’s expected receipt date. Automatic prediction will begin with this issue.
CAUTION
If the pattern has a non-zero Receipt delay, be sure to use it in your calculation.
For example, if the sample serial had a receipt delay of –10 (days) because its issues arrive about 10 days before the cover date, then the Start date for the January issue should have been 12/22/1999 rather than 01/01/2000.
Prediction count – The starting issue’s occurrence number within the month. The default is 1. Enter a number larger than 1 only if the Regularity pattern is month-based, season-based, or user-defined, and there is more than 1 issue published in the month. For example, if you have chosen the second issue of April of a semi-monthly serial as your starting issue, then the value for this field should be 2.
Receipt delay – Approximate number of days after the predicted publication date that receipt of the issue is expected. Use a minus sign if issues are expected before the publication date. Examples: specify 7 for issues expected about 7 days after their predicted publication dates; specify –61 for issues expected about two months before their publication date; and so on. For most patterns you can assign a 0 value.
This form has the following buttons:
· – save the information on the screen into the next expected issue for the subscription. The next expected issue information is updated for all subscriptions on this title that are active, with the same Ship to code and are linked to the current type of holding/publication pattern.
· – the system displays 100 predictions (25 at a time) beginning at the Numbering and Start date defined on the Serial predictions form. Please refer to section 321.5.1.4.
· – same as button except the system will print out the list of predictions after you exit the Serial predictions form. Please refer to section 321.5.1.4.
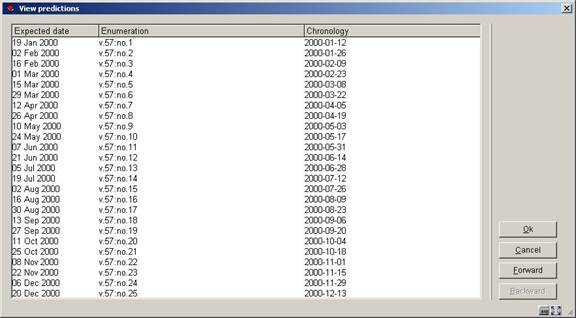
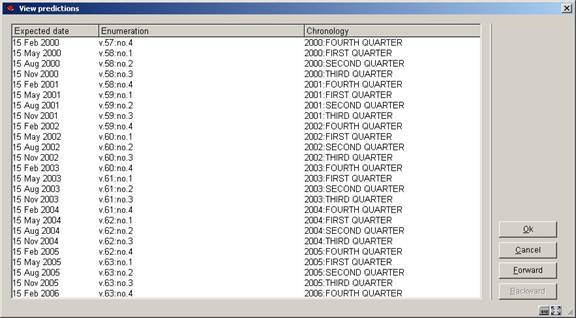
After choosing this option the View predictions form displays.

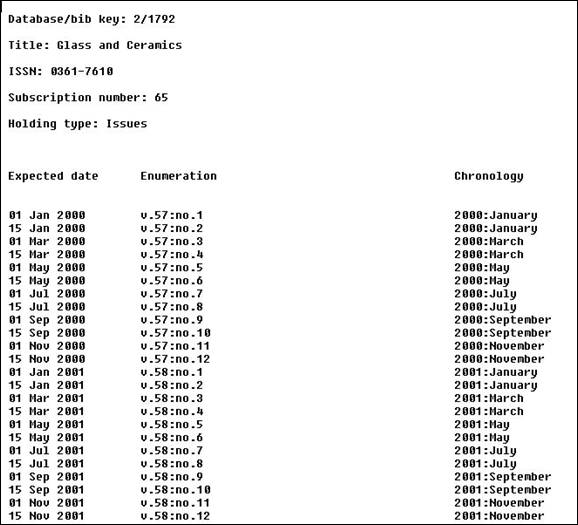
Expected date – this is the date that the system will expect the displayed issue
Enumeration – this is the numbering that the system will predict for the issue
Chronology – this is the chronology that the system will predict for the issue.
The system displays 100 predictions (25 at a time) beginning at the Numbering and Start date defined on the Serial predictions form.
This form has the following buttons:
· – select any entry from the grid and then press OK – the system returns you to the previous form.
· – return to the previous form.
· – display the next 25 predictions.
· – display the previous 25 predictions.
Printed predictions:
A sample of the printed output displays bibliographic key information, title, ISSN, subscription number, type of holding description and 100 predictions.
Most publication pattern changes are accomplished by editing one of the four groups on the Publication pattern screen and then returning back to the previous screen. Simple changes to publication pattern such as issues are now published in February instead of March; the expected receipt delay has changed; the text of the enumeration term has been corrected are handled with a simple update.
In the case that the publisher changes the publication substantially (i.e. in such a way that labelling information changes or the number of levels changes), you may want to use the Copy command to mark the current version of the publication pattern inactive and create a new active publication pattern into which you will make your changes. The old receipts are linked to the old pattern and any new receipts (including the next expected issue) are linked to the new pattern. The system closes off the summary holdings statement for the old pattern and begins a new separate summary holdings statement for the new pattern.
From the Publication pattern screen, select the option. The system displays the Save as template form.
Enter a unique name that will be helpful in identifying the contents of this template (i.e. Bimonthly). Your template will be available for other staff members to use when creating new publication patterns. Please refer to the Choose a pattern template field on the Add type of holdings form in Section 321.4.1.
The following screens illustrate some example patterns:
· biweekly. Refer to section 321.5.4.1.
· biweekly — with a receipt delay. Refer to section 321.5.4.2.
· semi-monthly — with a varying number of issues per month. Refer to section 321.5.4.3.
· semi-monthly — with a different start issue. Refer to section 321.5.4.4.
· quarterly. Refer to section 321.5.4.5.
· quarterly — with continuous numbering. Refer to section 321.5.4.6.
· annual supplement — with no enumeration. Refer to section 321.5.4.7.
· predicted erratic — with a non-predicted level of chronology. Refer to section 321.5.4.8.
· non-predicted erratic. Refer to section 321.5.4.9.
· third Wednesday of every month. Refer to section 321.5.4.10.
· annual supplement with roman numbering. Refer to section 321.5.4.11.
· continuous numbering with calendar change. . Refer to section 321.5.4.12.
This pattern illustrates a serial with basic issues published every second Wednesday. There are 26 no.s per v., and thus 1 v. per year.


This pattern is almost the same as the biweekly sample pattern. The difference is that this biweekly serial is usually received a week after its cover date, and thus its Receipt delay is 7 days. A receipt delay must be defined because the expected and chronology dates are not the same. The Receipt delay field is on the Serial predictions screen. When the Receipt delay field is used, the Start date field also changes by the number of days defined in the receipt delay.

This pattern illustrates a serial with basic issues normally published twice a month. However, a third issue is published in February and May, and no issues are published in March. The Base level is set to the next-to-lowest level of enumeration (2) so that the no. numbering is incremented at the beginning of each month even though the number of pt.’s varies from month to month. Because March is skipped, there are only 11 no.’s per v.
Refer to section 321.5.5 for additional illustrations of how numbering code, number of parts, calendar change and base level affect the predicted enumeration.


This pattern is the same as the semi-monthly pattern except that a different starting issue was selected at the Serials prediction form. Because we start with the third rather than first issue of the month, the Prediction count value is 3 rather than 1. Both the starting issue and the Prediction count are defined on the Serials prediction form.


This pattern illustrates a serial with basic issues published 4 times a year: in February, May, August, and November. Also notice that each v. begins in May rather than with the first issue of the calendar year. The Chronology Code Q-APR was set up by the library for serials whose first quarter is April to June rather than January to March.


This pattern is the same as the quarterly pattern except that the no. increases continually — it is not restarted for each v. The Numbering code is C, but the Number of parts is left at 4 because the v. numbering still needs to be incremented every 4 no.s. Notice that the Calendar change field is set to 05 (fifth month) so that the system is forced to increment the v. field in May.


This pattern illustrates a supplement that is published annually in November. It is unnumbered and thus has no enumeration, only chronology.

This pattern illustrates a serial with 5 issues per year that is published erratically, at no particular time of the year. You know “what” but not “when”. Specify enumeration levels and a period of 73 (i.e. 365/5) days between issues so that the system predicts enumeration numbering and approximate receipt dates. Make sure that you set a long Claim cycle in the subscription record so that the system is not too quick to generate claims for “overdue” issues.
Because the serial also uses varying forms in its second level of chronology (e.g. DECEMBER, YEAR END, MID-WINTER, etc.), assign NP (meaning “no prediction”) as the second level’s Chronology code. When checking in an issue, you will be able to enter any value you wish for this chronology level.
If the varying forms were found in the enumeration, you would set up an enumeration level with an Enumeration code of FREE for free text. When checking in an issue, you will be able to enter any value you wish for this enumeration level.


This pattern illustrates a serial, with an unknown number of issues per year, that is published erratically, at no particular time of the year. Turn auto-prediction off; specify 99999 (or more) no.’s per v. because you do not know how many there will be; and specify 365 days between issues so that the system does not forget about the serial.

This pattern illustrates a serial that is published on the third Wednesday of every month except in July and August. This pattern does not easily fit into a month-based or day-based regularity pattern so we use a user-defined regularity pattern instead. With a calendar on hand, manually enter all of the prediction dates for one year into the Dates published field (i.e. for 2005 the valid dates are 0119,0216,0316,0413,0518,0615,0921,1019,1116,1221). Make sure that you mark this title in a way that reminds you to return to the publication pattern next year to make new predictions.


This pattern illustrates a supplement that is published annually in November. It is numbered using roman numerals. It has no chronology.


This pattern illustrates a monthly publication with 2 v.’s per year. The no. level increases continually and it is not restarted each v. The Numbering code is C and the Number of parts is set to 6 because the volume numbering still needs to be incremented every 6 no.’s. To force the v. to increment in June and December, the Calendar change field is set to 06,12. This tells the system to automatically increment the v. level when a prediction is made for these months.


A complex month-based pattern with varying number of issues per month has been chosen to illustrate the effect of three of the definition fields: number of parts, base level and numbering code.
This sample serial has 3 levels of enumeration: v., no. and pt.
and the following regularity pattern:
JA-1, FE-1, MR-3, AP-2, MA-4, JU-1, JL-1, AU-1, SE-1, OC-1, NO-1, DE-1
i.e. 3 issues in March, 2 in April, 4 in May and 1 in all other months.
The table following shows the effect on the predicted no. and pt. numbering when you change the pattern definition in 3 ways:
1. pt.’s Number of parts = 4 (true maximum) versus 3
2. Base level = 2 (next-to-lowest level) versus 3 (lowest level)
3. pt.’s Numbering code = R (restart/reset) versus C (continuous).
An asterisk (*) marks the issues at which no. is incremented. For convenience, only the first 12 issues of the year are shown and the v. numbering is omitted.
NOTE
Many of the resulting predictions are not what the library would want for the serial; they are presented here only for comparison. For accurate enumeration, the library would likely specify Number of parts = 4, Base level = 2, and Numbering code = R or C.
· Document control - Change History
|
Version |
Date |
Change description |
Author |
|
1.0 |
July 2006 |
creation (complete revision for release 2.4.2 serials modifications) |
|
|
2.0 |
March 2007 |
added info on grid navigation for pattern definitions; added explanation of new options on receiving screen |
|
|
3.0 |
October 2007 |
amended info & screen shot for adding Type of Holding (321.4.1); Delivered as part of 2.4.2.4 updates |
|
